Chapter 2: Relational Database Management Systems
2.1 PostgreSQL/PostGIS Installation
PostgreSQL is one of the two major open-source relational database management systems (RDBMS).
PostgreSQL runs as a server, waiting in the background of your computer for requests for information from its databases.
The application pgAdmin runs in the foreground of your computer and provides a visual management console that lets you interactively administer PostgreSQL.
PostGIS is a set of database structures and functions that “spatially enable” PostgreSQL.
Setting Up Postgres on Macintosh
Postgres.app is an application that lets you easily start and stop PostgreSQL as needed, and includes PostGIS.
Installing PostgreSQL and PostGIS
- Download the most recent version of Postgres.app from postgresapp.com.
- Drag the application to your folder Applications.
- Double-click Postgres.app.
Its icon won’t appear in the Dock like other applications, instead it runs as a background application and adds the Postgres menu at the top of the screen. But for easier startup, you may want to drag Postgres.app into the Dock.
Configuring Postgres.app
- From the menu
 Postgres, select the menu item Preferences….
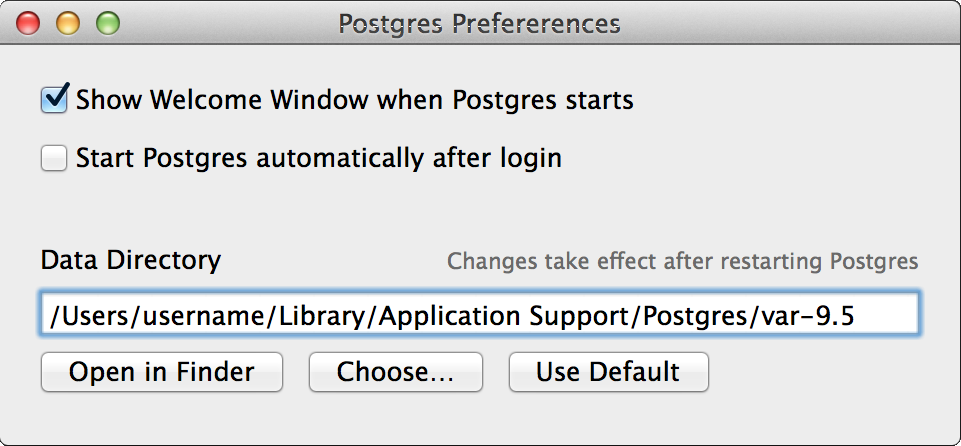
- To make Postgres.app somewhat more noticeable when it starts up, check on Show Welcome Window when Postgres starts.
- Since you’re using your computer for lots of other things, you might want to check off Start Postgres automatically after login. You’ll then have to start it up manually when you want to work with it.
- Postgres will store your databases in the Data Directory (username should be your username, of course). The default location in your hidden Library folder is an OK place for it as long you know how to find it (click the button Open in Finder).
- Close this window.
Installing pgAdmin
Once Postgres.app is in place, ![]() pgAdmin should be installed and opened:
pgAdmin should be installed and opened:
- Download the most recent version of
 pgAdmin from pgadmin.org, which is provided as a disk image (.dmg).
 - Open the disk image and drag
 pgAdmin to your folder Applications.
 - You may want to also drag
 pgAdmin from Applications into your Dock for easy access (not from the disk image!).
 - Because
 pgAdmin is from a developer unknown to Apple, the Mac will prevent its use unless you right-click (control-click) it to open its contextual menu and select the menu item Open. After this you can also double-click it (or single-click it in the Dock).
Setting Up Postgres on Windows
Determining the Version of Windows
For all Windows software, get the 64-bit version unless you are still running a 32-bit Windows system. To determine this:
- Menu
 Start;
 - Right-click (control-click) Computer to bring up its contextual menu;
- Select the menu item Properties;
- In the resulting dialog View basic information about your computer, in the section System, review the value of System type.
Installing PostgreSQL and pgAdmin
- Download the most recent version of PostgreSQL from EnterpriseDB.com.
- Open the installer from wherever it was downloaded and follow its instructions. Use the default values, but:
- Note the location of the Data Directory, probably in
C:\Program Files\PostgreSQL\9.5\data; - Don’t start up the StackBuilder application for now.
- Note the location of the Data Directory, probably in
Installing PostGIS
- Download the PostGIS executable from OSGeo.org.
- Open the installer from wherever it was downloaded and follow its instructions. Use all of the default values.
Starting pgAdmin
- Menu
 Start;
 - Click All Programs;
- Click the folder PostgreSQL;
- Click
 pgAdmin.
Postgres Configuration with pgAdmin
The application ![]() pgAdmin looks very similar on both Macintosh and Windows computers. When you open it you should see an object called
pgAdmin looks very similar on both Macintosh and Windows computers. When you open it you should see an object called ![]() Server Groups in the left-side pane, known as the Object Browser.
Server Groups in the left-side pane, known as the Object Browser.
If you are on Windows, you may also see a PostgreSQL server connection listed. If necessary, click the disclosure buttons ![]() /
/![]() to the left of the objects
to the left of the objects ![]() Server Groups and
Server Groups and ![]() Servers to see it. The server may be called
Servers to see it. The server may be called ![]() PostgreSQL 9.5 as in the image below.
PostgreSQL 9.5 as in the image below.
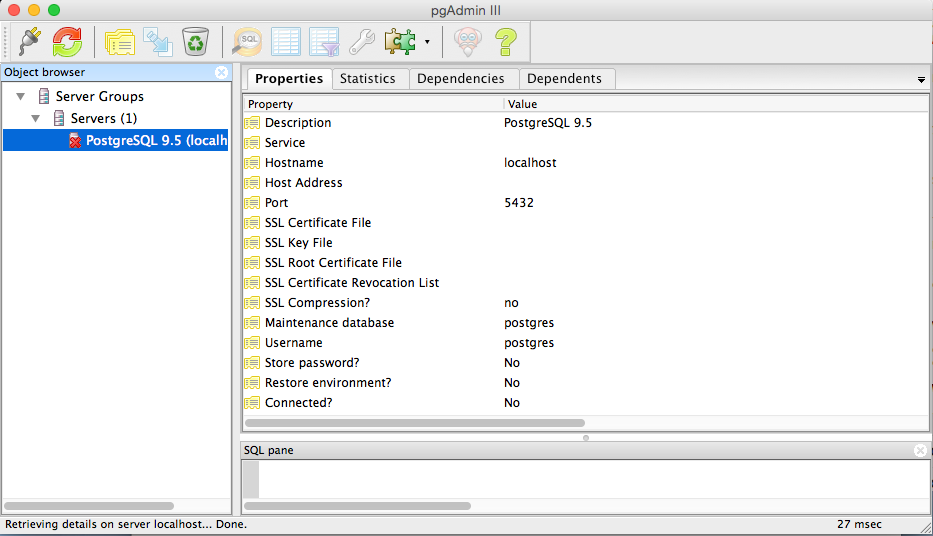
The server name will be followed by the description (localhost:5432), which means that the hostname of the computer where the server is located is localhost, which is your local computer, and it is communicating over port 5432. If you select this server, this information and more will appear in the top-right Information Pane in the tab Properties.
One other important bit of information here is the username, here postgres. This is the superuser, with authority to do anything in the database server, and is a login role that is created on installation.
Creating a New Connection to the PostgreSQL Server
If you installed the PostgreSQL software on Macintosh, you need to create a new server connection for the postgres login role:
- In the toolbar, click the button
 Add a connection to a server.
 - In the dialog New Server Registration, click the tab Properties:
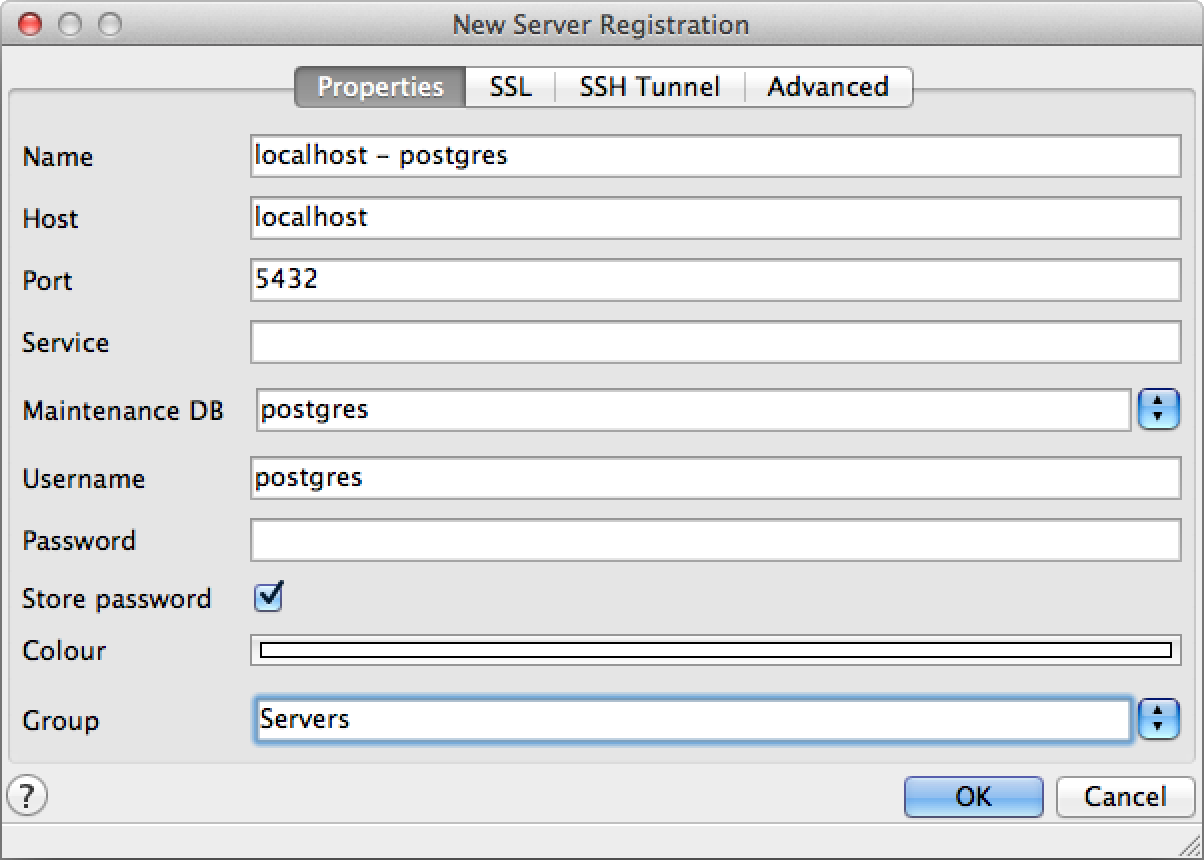
- In the text field Name, provide a descriptive name that will distinguish it from other server connections, e.g. localhost - postgres.
- In the text field Host, type localhost.
- In the text field Username, type postgres.
- Click the button OK.
- The object
 localhost - postgres should now appear in the Object Pane. In the future you can double-click this object to connect to the server with the postgres username.
Connecting to the PostgreSQL Server
To connect to the PostgreSQL server as the user postgres, simply double-click that server connection in the Object Browser.
If ![]() pgAdmin connects correctly, the server icon in the Object Browser should change from
pgAdmin connects correctly, the server icon in the Object Browser should change from ![]() to
to ![]() , and underneath it a number of objects will appear:
, and underneath it a number of objects will appear:
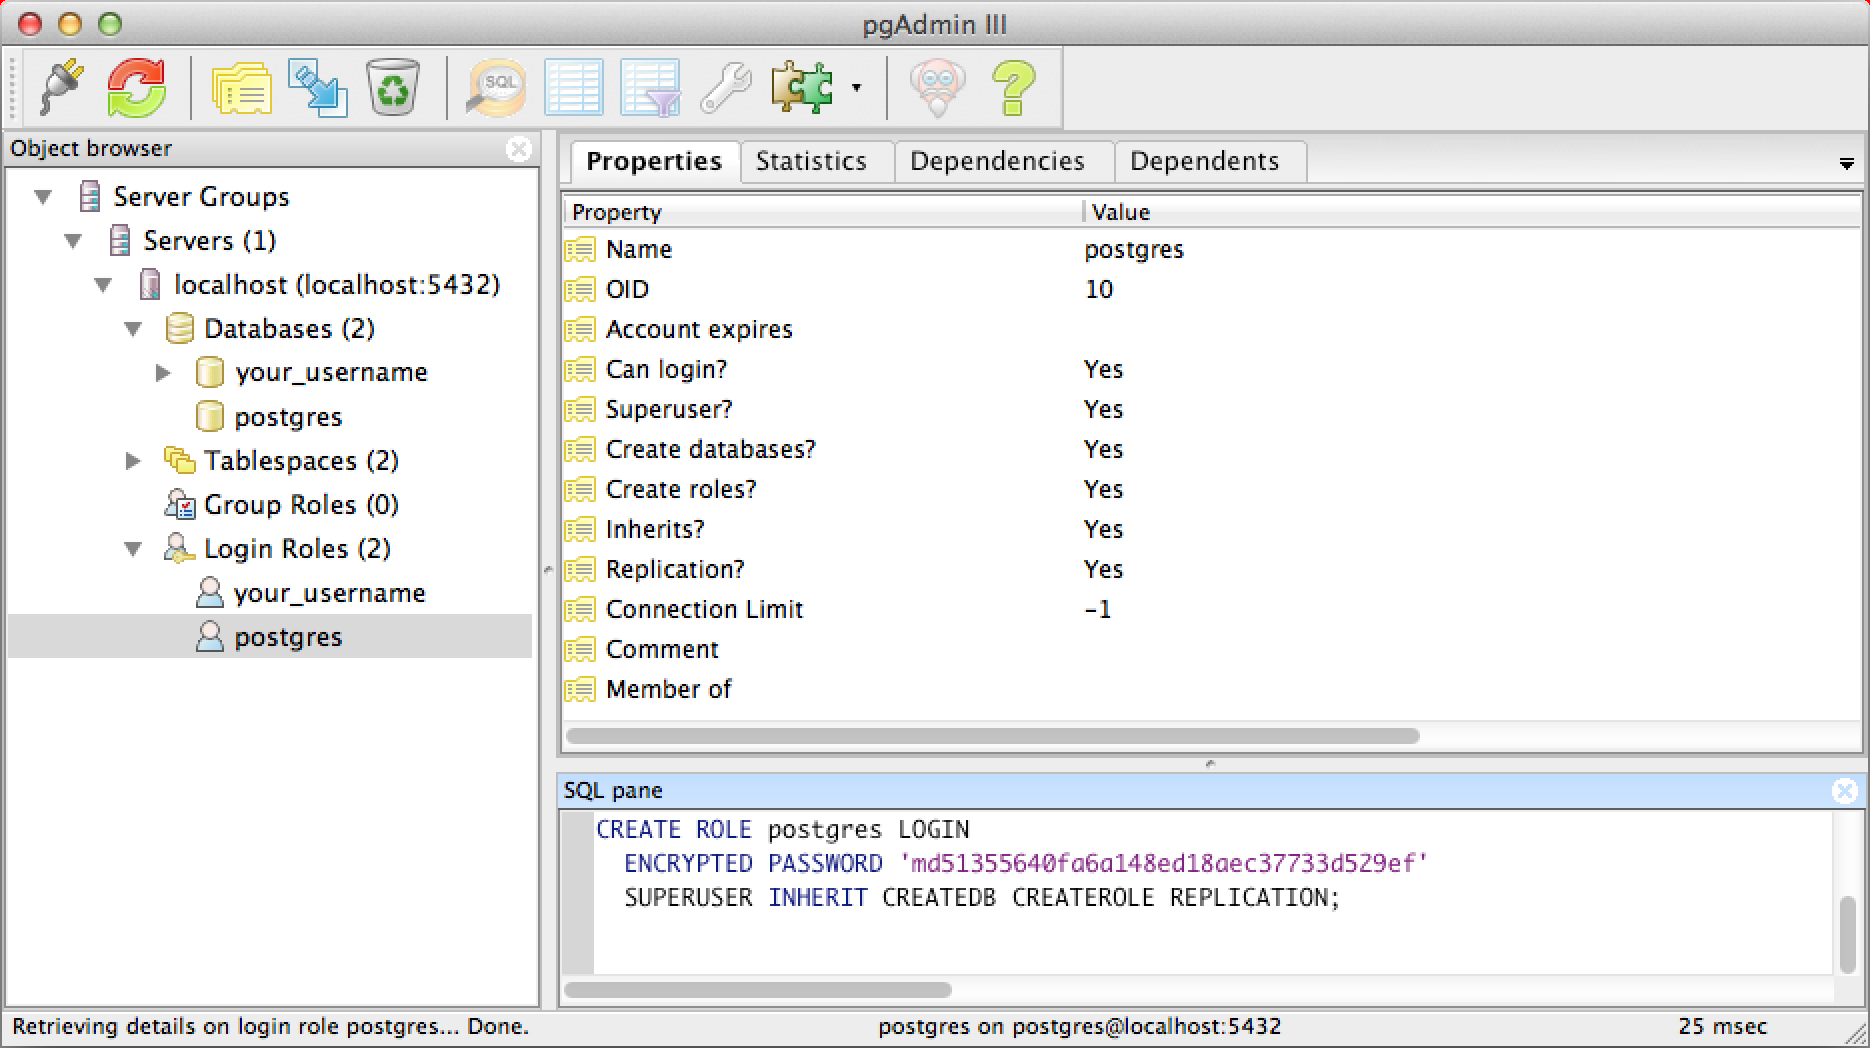
Both Macintosh and Windows users will see a database ![]() postgres and a login role (aka user)
postgres and a login role (aka user) ![]() postgres — you may first have to open the objects
postgres — you may first have to open the objects ![]() Databases and
Databases and ![]() Login Roles, respectively. In addition, Macintosh users will see one of each with their username, also created on installation.
Login Roles, respectively. In addition, Macintosh users will see one of each with their username, also created on installation.
Creating a Personal User
If you installed the PostgreSQL software on Windows, you should also create a user for your own work, as you don’t want to be ![]() postgres for that — accidental changes to the postgres database can be very damaging. But you do need to be
postgres for that — accidental changes to the postgres database can be very damaging. But you do need to be ![]() postgres to add another user:
postgres to add another user:
- Right-click (control-click)
 Login Roles to open its contextual menu.
 - Select the menu item New Login Role….
- In the dialog New Login Role…, click the tab Properties:
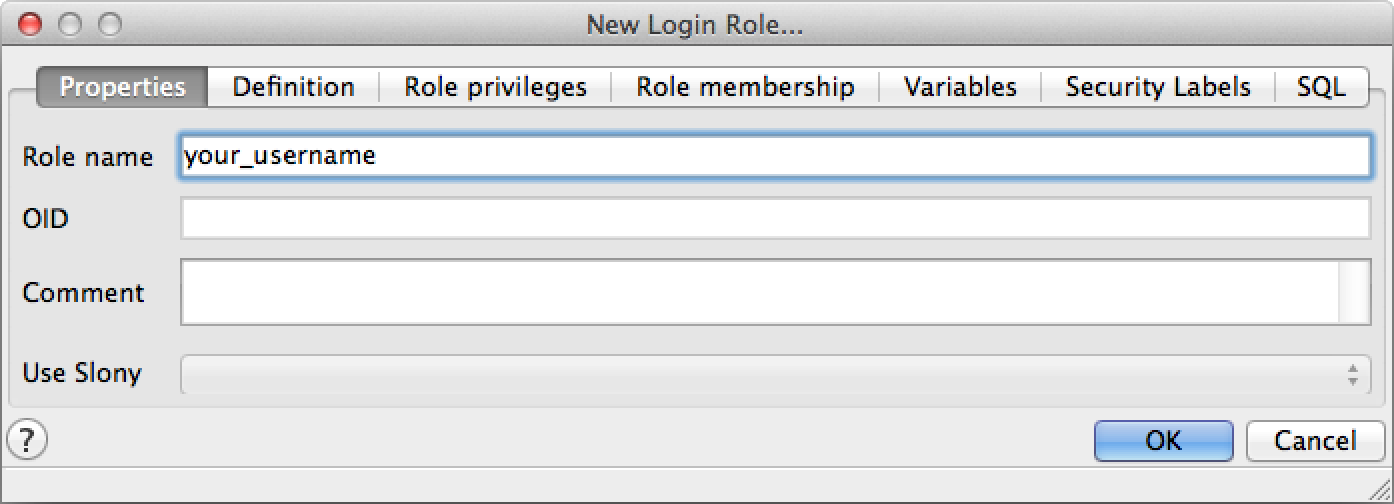
- In the text field Role name, type in your username on your local computer.
- Now click the tab Role privileges:
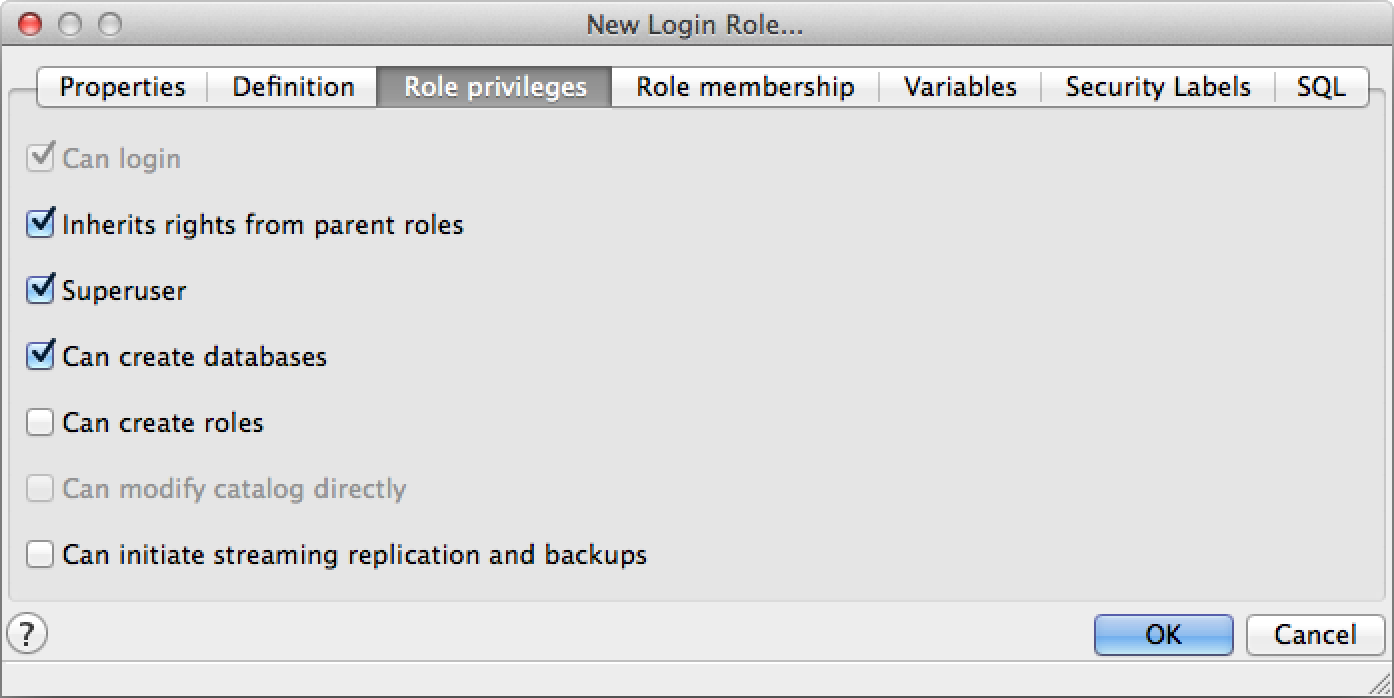
- Check on Superuser. Usually an ordinary user shouldn’t have superuser privileges, but this is necessary to use PostGIS.
- Check on Can create databases.
- Click the button OK.
Setting a User Password
The database ![]() postgres holds important general information such as which users can log in, what their privileges are, and what databases they have created. To protect access to this database, it’s very important to set a password for the user
postgres holds important general information such as which users can log in, what their privileges are, and what databases they have created. To protect access to this database, it’s very important to set a password for the user ![]() postgres, and write it down for future reference!
postgres, and write it down for future reference!
- Right-click (control-click) the user
 postgres to open its contextual menu.
 - Select the menu item Properties….
- In the dialog Login Role postgres, click the tab Definition.
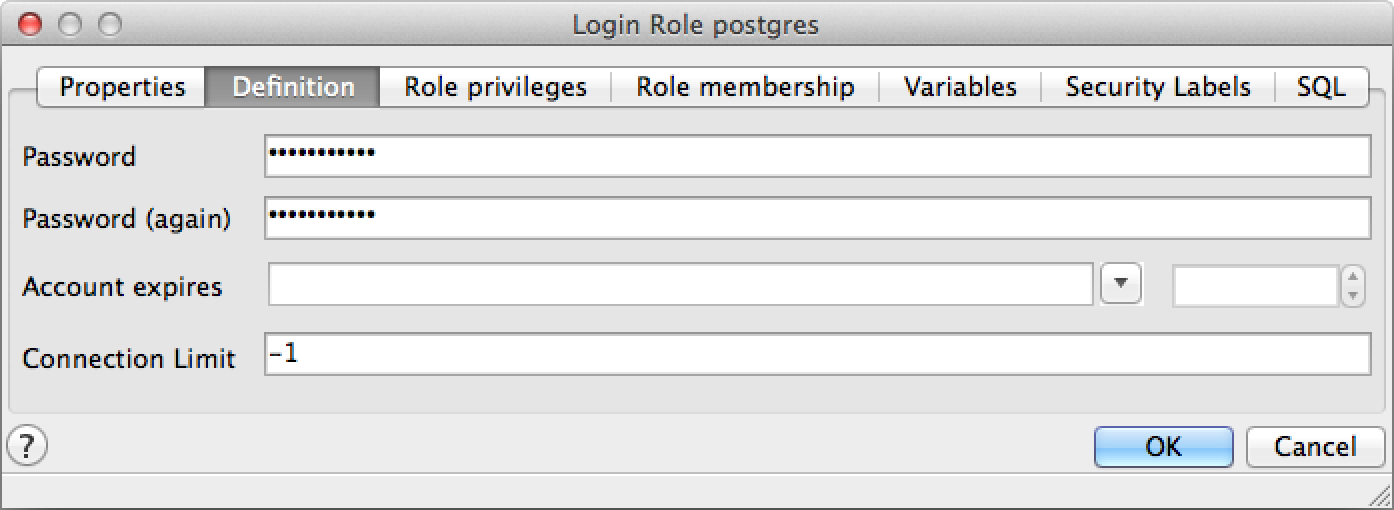
- In the text field Password, type in a password, and then type it again. Do not use a % character in the password!
- Click the button OK.
The next time you connect to this server with this login role, you will be asked for this password.
Important: You should repeat this procedure for your personal login role and assign it a password.
Disconnecting from the PostgreSQL Server
Now that we’re done with the login role ![]() postgres, disconnect it from the server:
postgres, disconnect it from the server:
- Right-click (control-click) its name (e.g.
 PostgreSQL 9.5 or
  localhost) to open its contextual menu.
 - Select the menu item Disconnect server.
Creating a New Connection to the PostgreSQL Server
Next, create a new connection for your personal login role:
- In the toolbar, click the button
 Add a connection to a server.
 - In the dialog New Server Registration, click the tab Properties:
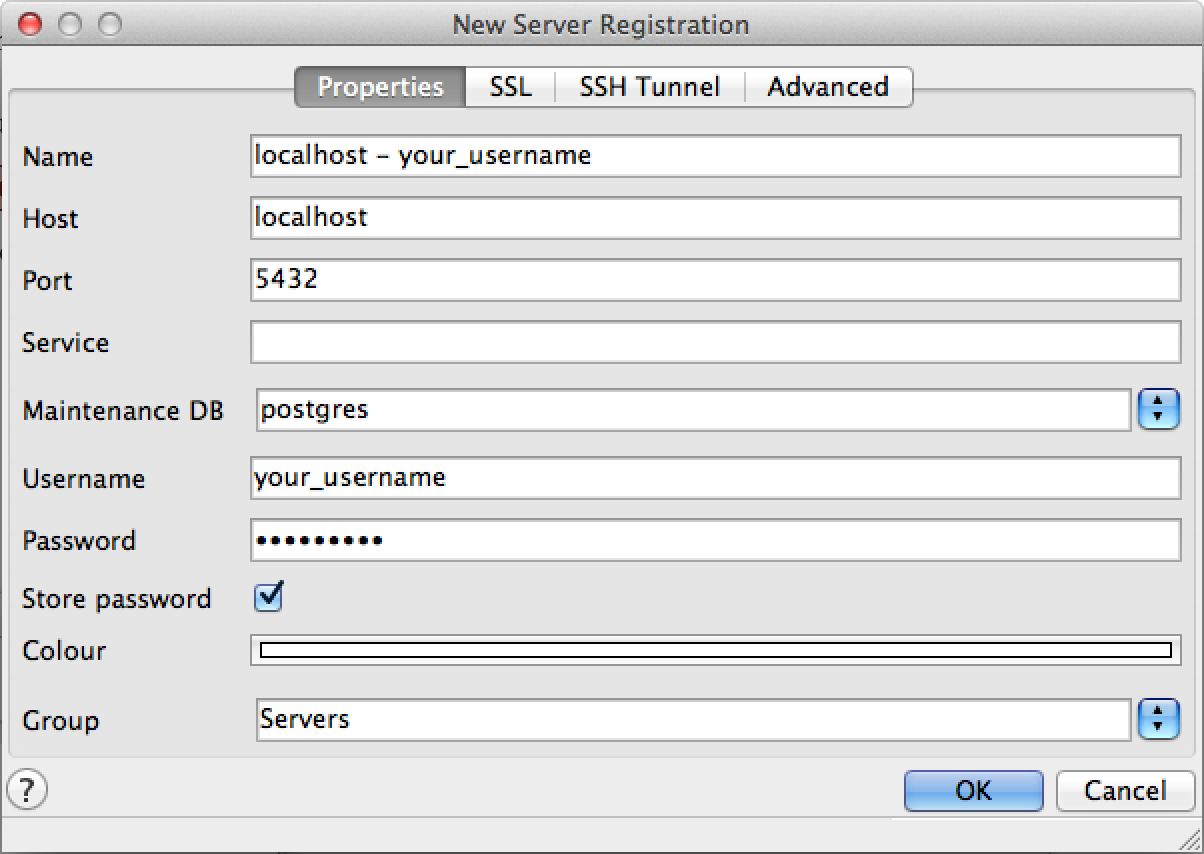
- In the text field Name, provide a descriptive name that will distinguish it from your previous server connection, e.g. localhost - , followed by your username.
- In the text field Host, type localhost.
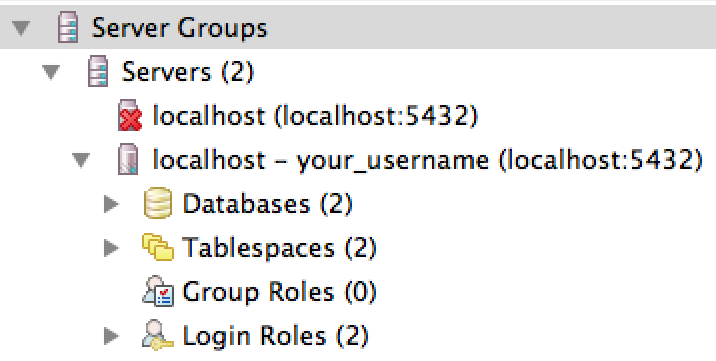
- In the text field Username, type your username.
- In the text field Password, type your password (if you set one).
- Click the button OK.
- The object
 localhost - your_username should now appear in the Object Pane. Double-click it to connect to the server.
Remember, the only difference between these two server connections is the login role used!
Creating a Personal Database
If you installed the PostgreSQL software on Windows, you need to create a personal database for your own work:
- Right-click (control-click)
 Databases to open its contextual menu.
 - Select the menu item New Database….
- In the dialog New Database…, click the tab Properties:
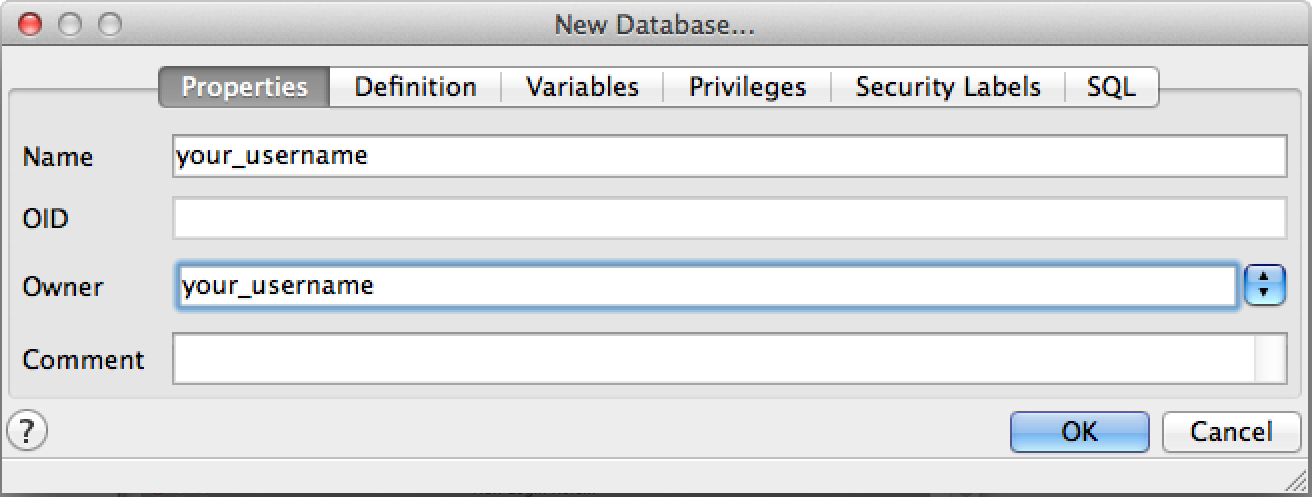
- In the text field Name, type in your username.
- In the text field Owner, also type in your username.
- Click the button OK.
Spatially Enabling a Database
To spatially enable your database, you must add the extension PostGIS. In other words, PostGIS is an optional extension to PostgreSQL that must be enabled in each database you want to use it in.
- Select your database and open it to display the tree of objects.
- Right-click (control-click)
 Extensions to open its contextual menu.
 - Select the menu item New Extension….
- In the dialog New Extension…, click the tab Properties…:
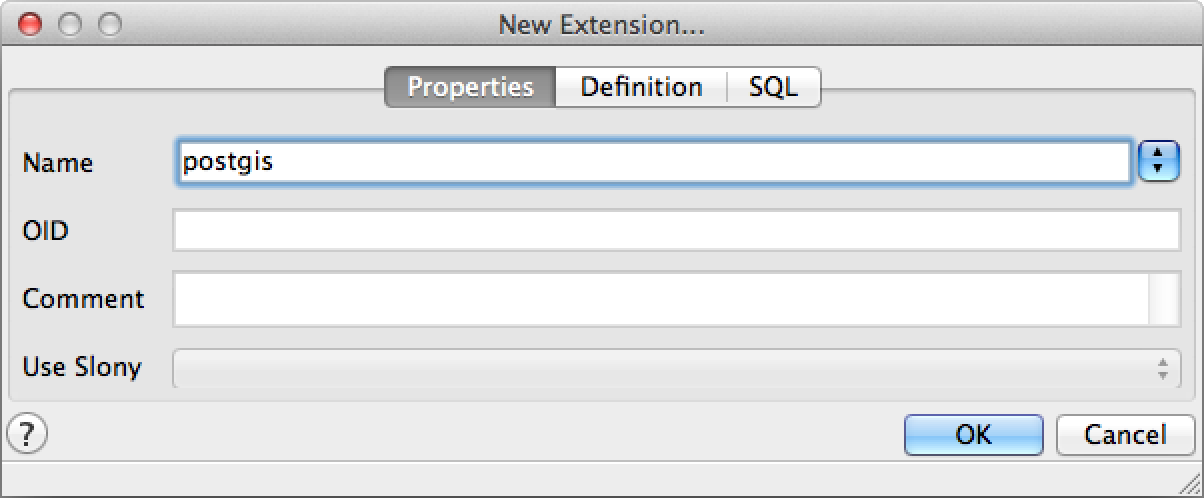
- In the text field Name, type in postgis. You should also be able to select it from the menu at the far right of the field.
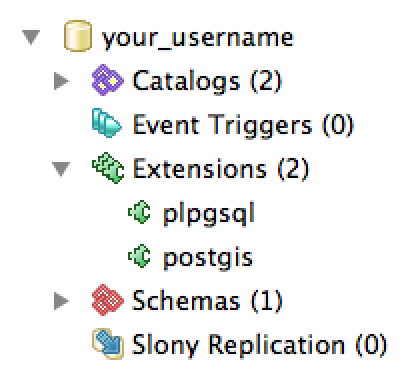
- Click the button OK.
- The extension
 postgis should now appear in the Object Pane.
SQL Queries
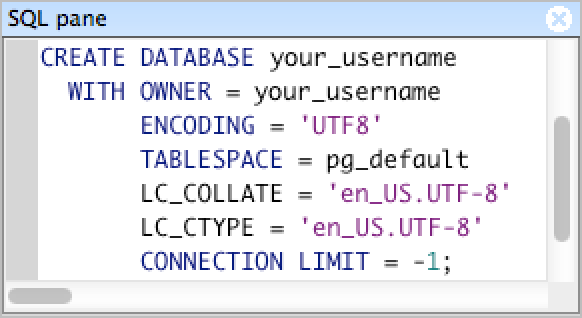 As you proceeded through the previous steps, you may have noticed various statements whizzing by in the SQL pane. These are written in the most common database programming language, Structured Query Language (SQL), which is pronounced either as “sequel” or by spelling it out “S-Q-L”. These statements are built in response to the choices you made, and in fact appear in the SQL tabs of the dialogs above. They are only executed when you click OK.
You can write and execute arbitrary SQL queries in ![]() pgAdmin. For example, to test that PostGIS is operational in your database, you can call a function that prints out the version of PostGIS that is installed:
pgAdmin. For example, to test that PostGIS is operational in your database, you can call a function that prints out the version of PostGIS that is installed:
- Select the database where you want to run the SQL query, e.g. the one labeled with your username.
- In the toolbar, click the button
 Execute arbitrary SQL queries.
 - In the dialog Query - …, click the tab SQL Editor:
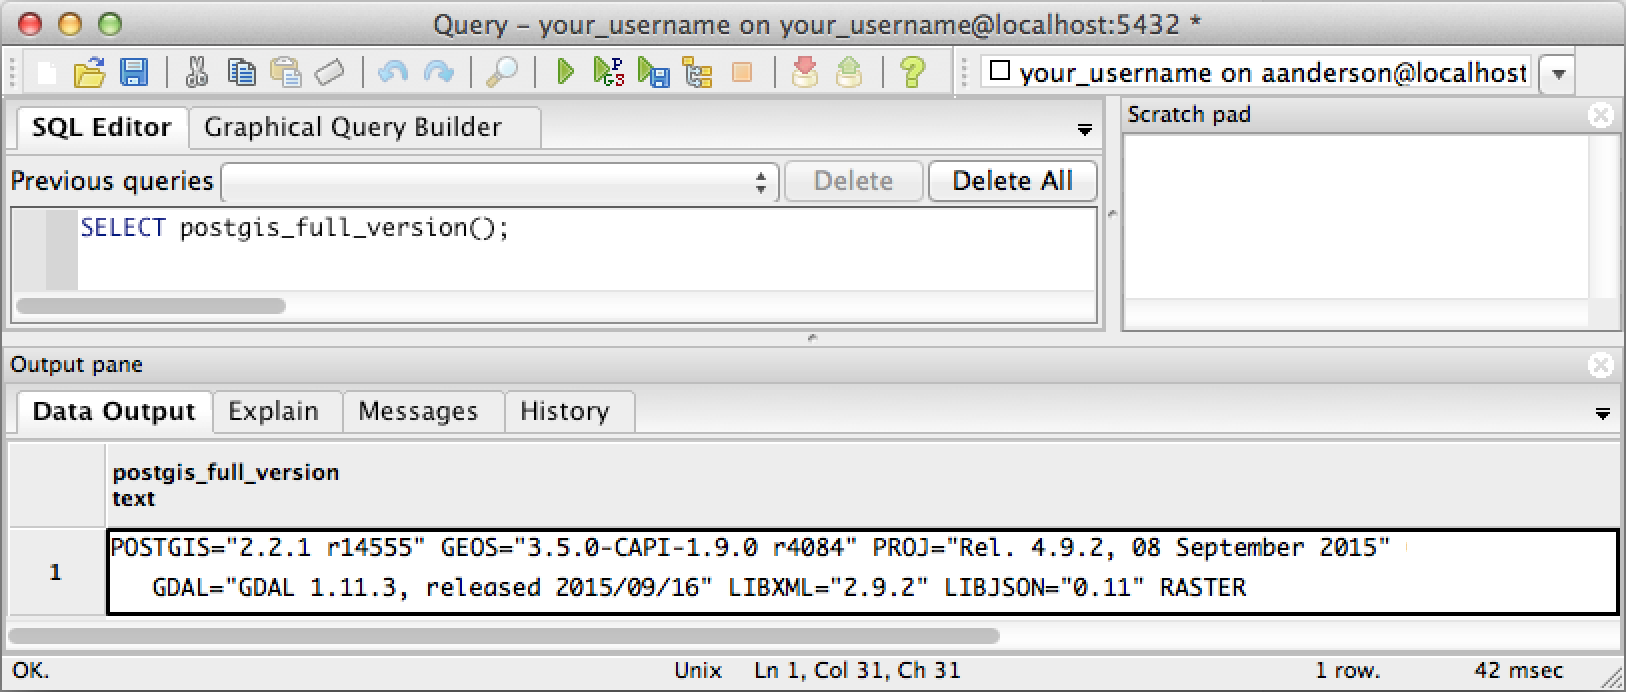
- In the text field below the menu Previous queries, you can paste any SQL command, e.g.
SELECT postgis_full_version();. - Run the query by clicking on the button
 Execute query.
If PostGIS is operational you should see a description of its version in the Output pane.
Congratulations! You now have a PostgreSQL database with the PostGIS extension and ![]() pgAdmin installed on your system. Proceed to the next set of pre-class material, where you will learn more about SQL.
pgAdmin installed on your system. Proceed to the next set of pre-class material, where you will learn more about SQL.