5.3. Introduction to Serving Geospatial Vector Data using Geoserver
5.3.1. Introduction
Recall in previous exercises we had you install Postgres as a server on your laptop, and your laptop was acting both as a server with Postgres, and as a client using pgAdmin and QGIS.
In this exercise, we now are going to install a “Geoserver” on your laptop as well (see the Figure below). Your laptop will be running two servers (Postgres and Geoserver) for your client application QGIS to access. Simply put, “Geoserver” (or other similar servers, such as “Mapserver”) is a an open source computer server that shares geospatial data. It follows the open standards established by the Open Geospatial Consortium.
![[Fig_5_3_1.png]](images/chapter5_3/Fig_5_3_1.png)
Figure caption: System Architecture for Web Mapping. A derivative of figure developed by RRZEicons. CC-BY-SA-3.0. and available at Wikimedia Commons. We learned about this figure from Sterling Quinn and his exercise at https://www.e-education.psu.edu/geog585/node/684
5.3.2 Get some data for this exercise (Mass Biketrails line shapefile) and import it into a “Massbike” PostGIS database
You’ve built a Postgres/PostGIS database before and have imported shapefiles, but it is always good to get some more practice. Try to do this by memory, or if you get stuck, go back and review the Key Postgres and PostGIS steps from Weeks 2 and 3 document. That document also has new information added to remind you about how to create groups/userids for your database so you don’t log in using the postgres superuser account.
Download and unzip the Biketrails shapefile dataset from MassGIS.
In pgAdmin:
If you need to, first create a new user (call it “user” maybe?) that is NOT postgres (the superuser) that you can use to create your postgres/postgis database. (See #1 in Key Postgres and PostGIS steps from Weeks 2 and 3 for information on that if you don’t know how to do this.)
Create a new Postgres database called “Massbike” that has an owner “user”. (See #2 in Key Postgres and PostGIS steps from Weeks 2 and 3 for information on that if you don’t know how to do this.)
Make the “Massbike” database a PostGIS database. (See #3 in Key Postgres and PostGIS steps from Weeks 2 and 3 for information on that if you don’t know how to do this.)
Connect to your Massbike PostGIS database in QGIS and import the Biketrails shapefile into this Massbike PostGIS database. (See #4 and #5 in Key Postgres and PostGIS steps from Weeks 2 and 3 for information on that if you don’t know how to do this.)
5.3.3. Install Geoserver on your laptop
Follow Geoserver Install Documentation for your operating system: http://docs.geoserver.org/stable/en/user/installation/
Choose either
Windows installer
or
Mac OS X installer
Important Notes:
GeoServer requires a Java 7 environment (JRE) to be installed on your system. This must be done prior to installation. The Geoserver install documentation directs you to download the proper version of the Java Runtime Environment (JRE) if not already on your computer.
Mac: you may have to use “ctrl-open” on Mac if the application is not recognized as “safe” to open.
Under the Geoserver menu, start the server.
You may see some warning about security issues. We will address some of these issues in the exercise.
The web interface shown at http://localhost:8080/geoserver requires a login before you can do anything useful. Use the default “admin” as username and “geoserver” as password.
To change your admin password in the web interface (see steps 1-6 in images below):
Select Users, Groups, Roles
Select Users/Group Tab
Click on admin under the Username column
Change the Password and Confirm
Click Save
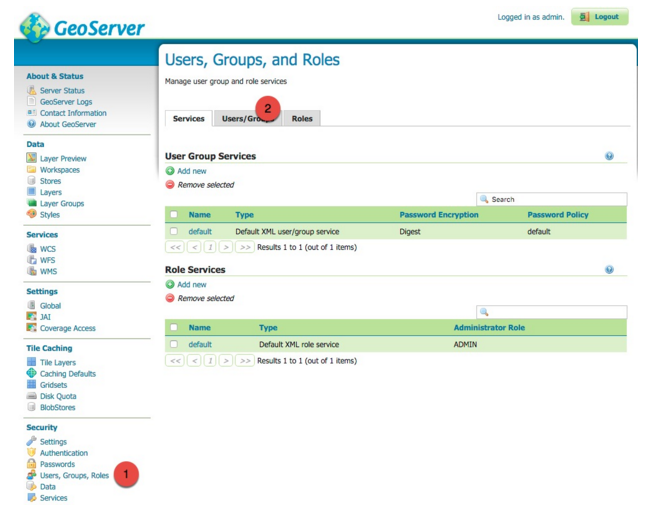
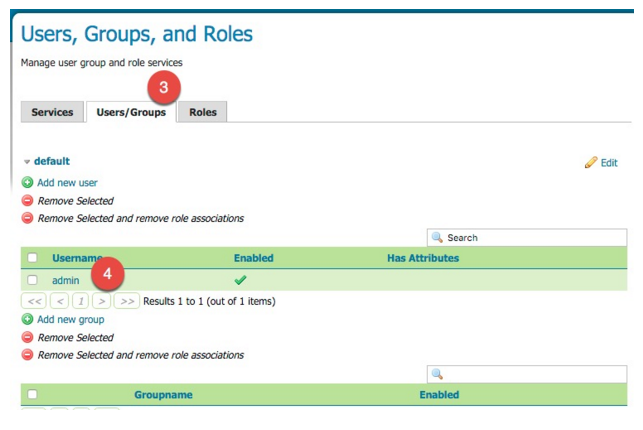
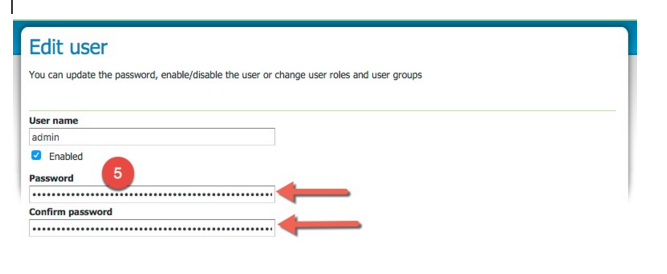
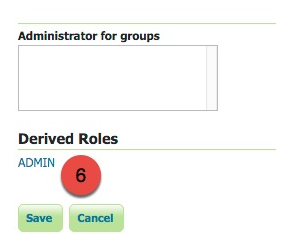
You should read through the Web Administration Interface Quickstart. You will be making some of the changes suggested in this guide (such as Contact Information) once you begin project work on the server. For now, just read through the options.
5.3.4. Publishing Vector Data (in this case, your Biketrail stored in a PostGIS Table)
We begin with publishing a vector thematic shapefile from our PostGIS Table and will generally follow the process outlined in the documentation found here: http://docs.geoserver.org/stable/en/user/gettingstarted/postgis-quickstart/index.html
You should have already loaded your shapefile (biketrails_arc.shp) into PostGIS in the steps outlined in section 5.3.2 above.
Follow the directions starting with “Create a Data Store”, but substituting values appropriate for our data as specified below:
Choose PostGIS - PostGIS Database for the new Vector Data Source (NOT PostGIS NG)
[Basic Store Info]
- Data Source Name: biketrails_arc
- Description: Massachusetts Bike Trails
- Database: “massbike”
- User: your postgres user you created in Section 5.3.2. above (we chose “user”)
- Passwd: your password you selected (we chose “user”)
The PostGIS data Connection Parameters should reflect which PostGIS database you used for your biketrails shapefile. Remember that you should refrain from the “postgres” user if possible since that is an administrative user that can alter the entire database!
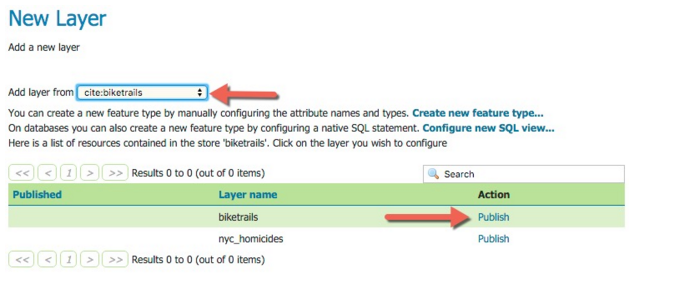
The “New Layer” window should appear.
Your should see and select the “biketrails” layer name in the layer dropdown list. (Depending on the operating system you are using this might look slightly different):
Under Action, click “Publish”
Type in “Massachusetts Bike Trails from MassGIS” for the Abstract.
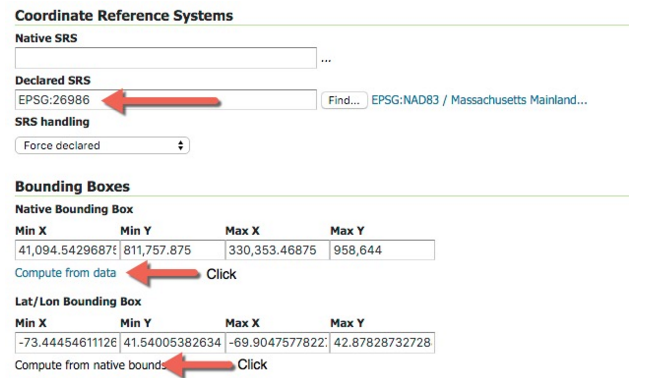
For the Coordinate Reference System (or Declared SRS), click the Find button, and search for Massachusetts or 26986 and then select the code number (26986). This stands for State Plane Massachusetts Mainland, NAD83 datum.
Then click the Compute from data and then Compute from Native bounds to fill in the correct values (see Figure below)
Go back to the top of the screen and click the Publishing Tab, and make sure the “Default style” is line, given the bike trails is a line vector layer.
![[Fig_5_3_4_5.png]](images/chapter5_3/Fig_5_3_4_5.png)
Click “Save”.
You now should have a “massbike” PostGIS layer that is being served by your local GeoServer (the one running on your laptop).
You should be able to complete the steps to Preview the Layer. You should also be able to add this layer to QGIS by establishing a WFS connection similar to what we did in Week 1. However, you will be connecting to your local computer instead of a server. For example, http://localhost:8080/geoserver/cite/wfs
When successful, take a screenshot of your QGIS screen displaying your WFS biketrail data and upload to Moodle under this week's pre-class section.